Pages

December 29, 2012

Vanilla Cupcakes


Hurray !! Dyuti told me "Amma, this is the best ever cupcake". Received a great compliment from my kiddo this morning. Thank you so much my little Peppa piggie. Peppa pig is her fav cartoon character and at times she like to be called Peppa Pig and calls us Daddy pig and Mummy pig : D

I've had stocked cupcake baking moulds for almost 2 months, but never tried making cupcakes. It got delayed by vague reasons. Today I was in the mood for baking and told Dyuti I'm making cupakes for her. From that moment onwards, she has been asking me every 5 minutes whether cupcakes are ready or not and peeping to my oven door when the baking smell hits her.


I was thinking of baking Christmas cake; but couldn't plan it well this time. We were bit busy and what is the point in baking a cake with just three of us. Have to plan one day as I've bought few new stuffs for making cake fondants.

Now these cupcakes are so moist, fluffy and will love it for sure. Dyuti was waiting patiently when I was taking the clicks to get her hands on the cuppie cakes.


Dyuti helping me with piping the frosting. She chose cupcakes that were in pink paper liners and was not willing to have the non-pink ones. So I chose to tint the frosting with her favourite pink color.

I've made buttercream frosting to decorate these cute little ones.

Recipe Source: JoyofBaking

Ingredients:

Unsalted Butter - 1/2 cup or 113 gms(at room temp)
Sugar - 2/3 cup
All purpose flour - 1 1/2 cups
Baking Powder - 1 1/2 tsp
Salt - 1/4 tsp
Eggs - 3 nos (at room temp)
Vanilla Extract - 1 tsp
Milk - 1/4 cup

Instructions:
  • Preheat oven to 350F(180C) and line cupcake baking mould with paper liners.
  • Beat butter and sugar using electric mixer until light and fluffy.


  • Add eggs one at a time, beat until well combined.
  • Beat after adding vanilla extract to the mixture.

  • Sieve the flour, baking powder and salt.
  • With the mixer on low speed, alternately add the flour and milk, in three additions, beginning and ending with the flour.
  • Make sure to scrape the sides of the bowl as needed.
  • Do not over-beat the batter. Stop mixing until dry ingredients are combined well.
  • Spoon the batter to the moulds. Just fill till 3/4th part as once it is baked, the batter will rise.
  • Bake for 17-20 minutes until toothpick inserted comes out clean. Do not over-bake as it will dry out.
  • Remove from oven and place on wire rack to cool.
  • Once cooled, frost the cupcakes or can indulge in without frosting.

Buttercream frosting:
Yields frosting for 8 cupcakes.  Double the measurement if needed.
Ingredients:

Butter - 1/4 cup
Confectioners Sugar - 1 cup
Vanilla essence - 1 tsp
Milk - 1 tbsp
A dash of pink color - I used Wilton pink gel paste


Instructions:
  • Using electric mixer, beat the butter until light and fluffy.
  • Add confectioners sugar and beat well mixed. 
  • Scrape the sides of the bowl as needed.
  • Add 1tbsp milk, vanilla essence and beat until smooth and fluffy.
  • Tint the frosting with a dash of pink gel paste and beat well
  • Scoop the frosting into a piping bag with a star tip and pipe the frosting on cupcakes
Note:
  1. Make sure butter and eggs are at room temperature. I keep both the eggs and butter out of the refrigerator the day before I plan to do any baking.
  2. Butter at room temperature - When you touch the butter, it should be similar to touching our skin 
  3. While adding eggs, the batter might look a bit curdled; nothing to worry about. Cupcakes will be perfect :)

December 21, 2012

Corn Sandwich


We had gone for a picnic along with my cousin Ritaechi & Radhuettan to Bowral Tulips Festival in Oct '12. I baked and packed Egg Puffs, Melting Moments cookies and brownies to munch on. Ritaechi called and told me she would be bringing sandwich.

Have to say, Ritaechi is truly a Masterchef. All of her recipes are very delicious and I've learnt few recipes from chechi which I would be posting later. Whenever we visit her home, she would prepare new dishes and  serve a minimum of 5-6 dishes. The dining table will be full of fantastic and variety dishes for her guests.

Ritaechi's corn sandwich was so yummy and we finished it all off. I got this recipe as well from her :) and have made 2-3 times. We all loved it.

Here goes the recipe and it is indeed an easy and very filling one with the crunchiness of corn kernels and very few ingredients. As Sathya is having pot luck today at office, I used 2 corn cobs. With 2 cobs, I could make 8 sandwiches. You can try this out this just 1 corn cob or a canned corn kernels and adjust the ingredients accordingly. Just spread butter on the bread slice and the filling, a simple sandwich is ready.

Recipe Source: Rita chechi

Ingredients:
Corn cobs - 2 nos
Onions - 2 nos (chopped)
Tomato - 1 no (chopped)
Green chilly - 1 no (finely chopped)
Salt
Pepper Powder
Oil - 2 tbsp (I use Extra virgin olive oil)
Coriander leaves - To garnish

Instructions:
  • Cut the corn from the cob. I prefer to use fresh corn kernels rather than the canned ones. You may use canned corn kernels to ease your work.
  • If using fresh corn kernels, microwave the kernels for 3 minutes with salt.  Mash the corn kernels after it's cooked. Not sure about the canned ones.If the canned ones seem raw, clean the canned kernels in water and microwave.
  • Pour oil in a hot pan and add chopped onions and green chilly.
  • When onions turn translucent, add the chopped tomatoes and let it turn mushy.
  • Now add the corn kernels. Adjust salt and pepper powder to your taste.
  • Fry the mixture for 5 minutes.
  • Turn off the flame and garnish with chopped coriander leaves.
  • Once the mixture is cooled, you may fill it up.
  • Spread butter on the bread slice and place 2 tsps of the mixture for filling.
  • Serve it up :)

December 18, 2012

Goan-style Chicken Moelho


This recipe has very similarity to Chicken Vindaloo, both originates from Goa. I've adapted this from a book "Curry Easy"written by Madhur Jaffrey. Not that I've a habit of collecting recipe books, I happen to get good culinary books from the library.

Now I'm not sure whether all of your palettes like the Goan dishes. Back home, Mummy makes Vindaloo and I loved it. Both of this recipe has garlic, vinegar and chillies in common and gives the dish a slightly 'pickled' feel. Well it's good to try out something different rather than following the routine recipes.

I like to try all varieties and modifications of Chicken recipes and would definitely post the good dishes which my family feels in this blog.

Recipe Source: Adapted from "Curry Easy" by Madhur Jaffrey

Ingredients:

Chicken: 1 full (medium)
Cumin powder: 1 and 1/2 tsp
Mustard Seeds: 1 tsp (crushed and coarse powder)
Turmeric Powder: 1/2 tsp
Kashmiri Chilli Powder: 1 tbsp
Red Chilli Powder: 1/2 tsp(hot)
Red Wine Vinegar: 1 and 1/2 tbsp(plus little more as needed). I used White vinegar.
Garlic cloves: 4 (crushed)
Onions: 2 nos (sliced)
Olive Oil - 3 tbsp
Salt

Instructions:

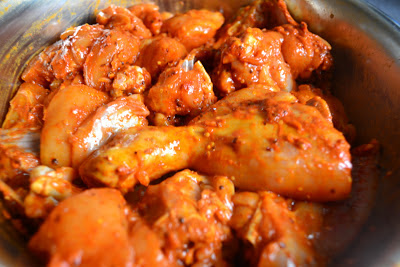
  • In a non-reactive (ceramic, glass or stainless-steel) bowl, combine the chicken pieces with cumin powder, mustard seeds, turmeric powder, kashmiri & red hot chilli powders, white vinegar, crushed garlic cloves and salt.
  • Mix well, marinate for 1-2 hours and refrigerate.
  • Pour oil in a hot frying pan, put in onions and fry it until the onions brown a bit.
  • Add in the marinated chicken and sir and fry until the chicken gets opaque.
  • Add half cup water, 2 teaspoons of vinegar, bring it to boil, cover with lid and cook the chicken.

  • Once cooked, heat in high heat and reduce the gravy to semi-dry consistency.
  • Serve hot as a side-dish with rice or chappathi.


December 17, 2012

Macaron Demonstration


While browsing for macarons, I've seen numerous times the "Macaron Making party" conducted at Paris International Cooking School. But didn't feel like attending it paying 45$ for just 2 hours and more over it's just a demonstration class which you can enjoy taking family & friends along. I kept that thought aside.

I had tried making it two months back. It wasn't that perfect; but was edible enough. Then read a lot on the techniques behind a successful macaron and found I missed some important instructions while in the making such as ageing & beating egg whites, folding up, oven temperature, precise weigh measurements etc ..

Sathya came across on one of the Sydney daily deals an offer for this same macaron making just 15$. Oye !! I thought now that's good deal and jumped on it. Booked a session on Saturday 5-7 PM, with Sathya baby-sitting Dyuti :).


Li'l one was more excited than me hearing that I would bring some macarons after the class. She gave me the specification as well. She wanted a pink macaron and not any other color. I was thinking what if they won't have any pink one available, I would be in trouble.


The Macaron demonstration was shown by the French Head Chef Laurent Villoing. He started with the history of macaron. Although predominantly a French confection, it has its origin from Italy. The Laduree chain of pastry shops is said to be the world's best sold macaron. It has started an outlet in Sydney and the macarons are shipped from Switzerland.

The macarons is characterised by its smooth top, ruffled circumference (referred to as the "foot") and flat base. It is mildly moist and easily melts in the mouth. Macarons can be found in a wide variety of flavors and the fillings can range from jams to ganache to butter.


The Chef showed 5 varieties of macarons in that 2 hour session and there was tasting of them all. Chef  has given all the tips and tricks to make a perfect macaron and I would now plan to make a set in few weeks time.

Yeah, there happen to be 1 dark pink in the lot. Dyuti was happy seeing the pinky one. She adores the pink color so much that now only like to wear pink coloured dresses.


December 15, 2012

Shortbread Cookies


Dyuti just charmed me into making these utterly buttery delicious cookies. Few days back, she longed to have some cookies. She told me I haven't made cookies for a while now and wanted it on as the next To do.

I agreed to her wish. I had last bought Shortbread cookies from the store a month back to make base for the Cheesecake. When we took a bite of those cookies, we both loved it and full loaded with butter.. Hmmm it was so yummy. The minute she told me she wanted cookies, I decided I'm going to make these Christmas cookies the very next day.

Here goes the recipe.

Recipe Source: Joy of Baking

Ingredients:

All-purpose flour - 2 cups
Unsalted Butter(at room temperature) - 1 cup (225 gm)
Salt - a pinch
Confectioners sugar - 1/2 cup (powdered sugar)
Vanilla essence - 1 tsp

Instructions:

  • Beat the butter using an hand-mixer for 3-4 minutes until fluffy.
  • Add the confectioners sugar and beat for another 2-3 minutes until well combined.
  • Add salt and vanilla essence and beat for 2 minutes.
  • Fold in the flour mixture in 4-5 batches.
  • Flatten the dough, wrap it in a plastic and refrigerate for an hour.

  • Once chilled, place the dough out from the refrigerator and let it be in room temperature for 5-10 minutes.
  • Lightly flour the kitchen counter and roll out the dough in 1/2 inch thickness.
  • Use any cutter to cut into desired shaped.
  • Prick few holes with a fork
  • Dust-off the excess flour from the cut-cookies.
  • Place the cut-cookies on a parchment paper and place it in refrigerator for 5-10 minutes.

  • Repeat the rolling with the left-over dough until all done.
  • Preheat oven to 350F and bake the cookies till golden brown.
  • When cooled, keep the cookies in an air-tight container for up to a week.


December 14, 2012

Mutton Pepper Fry


This one is for the mutton lovers, Dyuti & Sathya. This mutton fry is really delicious.

Dyuti & me went in the morning to buy a kilo of mutton. But after removing the fat and taking out the bones that these butchers hid along with the meat, I think I may have only 750 gms of meat left.. very pity..

Recipe Source: My own :)

Ingredients:

Mutton - 750g 
Onions - 3 nos (medium)
Tomato - 2 nos
Turmeric Powder - 1/2 tsp
Pepper powder - 1 and 1/2 tbsp
Fennel Powder - 1 tsp
Garam masala - 1 tsp
Coconut Oil
Water
Salt

For Marinating Mutton:

Coriander leaves - 4 tbsp (chopped)
Green chillies - 3 nos
Ginger - 1 tbsp (chopped)
Garlic - 1 and 1/2 tbsp (chopped)
Lemon juice - half of a lemon
Salt
  • Combine chopped coriander, green chillies, ginger & garlic in a mixer and grind to a fine paste using water.
  • Marinate mutton with the paste, lemon juice and salt and refrigerate for a minimum 1-2 hours or overnight.
Instructions:
  • Heat coconut oil in a pressure cooker.
  • When oil is really hot, add the sliced onions and sauté till golden brown in color.
  • Add turmeric powder, fennel powder & 1 tbsp of pepper powder. Roast the powders for a minute.

  • Add sliced tomatoes & sauté till it's mushy.

  • Now add the marinated meat and fry till the masala coats well.
  • Add half a cup of water, check for salt and pressure cook the meat.

  • Once cooked, in case there is a lot gravy, heat the pan in high flame and thicken up the gravy.
  • Before switching off the flame, add the remaining half tbsp of pepper powder and 1 tsp garam masala. This gives additional flavour.


Note:

Best to serve this in a semi dry consistency and pairs well with chappathi.
Adjust the spices & gravy according to your taste.

Crab Tomato fry


We both love crabs. However we prefer this spicy tomato fry than crab masala curry. You need a lot patience and time to take the meat out from it's shell. Enjoy the crab fry with plain rice. Adjust the spices according to your taste.

Recipe Source: My Maa..

Ingredients:

Crab - 3 nos
Onion - 2 nos (sliced)
Ginger - 1 tsp
Garlic - 1 and half tsp
Tomato - 2 nos (sliced)
Turmeric - 1/2 tsp
Chilli Powder - 1 and 1/2 tsp
Coriander Powder - 1 tsp
Curry leaves
Salt
Oil

Instructions:

  • Clean and cut the crab.

  • Heat oil in a pan. Add sliced onions and sauté till transparent.
  • Add grated ginger and garlic and sauté till the raw smell goes.
  • Now add turmeric, chilli and coriander powder and sauté for 2-3 minutes.
  • Add tomato slices and sauté till it is mushy.
  • Add crab, salt and curry leaves. Cover and cook until it is cooked.
  • Once cooked, heat it on high flame to thicken the gravy.
  • For Kerala touch, I drizzle coconut oil before switching off the flame :)

December 13, 2012

Mexican Rice with Raita


This is an easy peasy lunch-box menu. It doesn't need onions,ginger, garlic & tomato :) and so less chopping. It can't be rated as an authentic Mexican rice; but still has that Mexican flavour when you add capsicum. This pairs well with Raita. Also try adding pomegranates to Raita which gives an extra crunchiness.

I learnt this recipe from my Maami. She makes yummy vegan dishes. She came across this recipe from Hindu newspaper. I've slightly modified the recipe. You may use any vegetable(shredded cabbage) of your choice. The good part is no need of gravy with this rice combo. Best to use Kashmiri chilli powder to get the nice red color. Please make sure you heat it in microwave before you serve.

Recipe Source: Lalitha Maami

Ingredients:

Carrots : 2 nos (cut in julienne)
Capsicums: 1 no (cut in julienne)
Beans : handful
Kashmiri Chilli powder: 1 and half tbsp
Oil: 2 tbsp
Salt: To taste
Rice


Method:

1) Pour oil into the hot kadai.
2) Add carrots, beans, salt and fry till it is half-cooked.
3) Add capsicum and fry all the veggies until it is cooked.
4) Add Kashmiri Chilli powder and sauté till the raw smell is gone. Adjust the chilli powder according to your taste.
5) Fry for 2 minutes more so that the spice gets coated well with the veggies.
6) Combine the masala with the cooked rice and mix well.


7) Serve immediately.


December 6, 2012

Baklava from home-made Phyllo dough

As you can see, this is the very first post on my blog and I'm starting with a sweet treat. It's been sometime the idea of creating a blog haunting me. I've been taking snaps of all experimented recipes once they are set on the table for my family to relish upon. Saving all such snaps in my hard disk and looking at it makes me blush.That's the truth. Then thought why not jot down the recipe so I can refer later or at least my kid can find it useful at some point of time ; just now got a kick in my head. Not sure how long I'll have this craziness of posting the recipes and snaps.

My darling daughter Dyuti & loving hubby Sathyajith are my inspirations in experimenting new cuisines and desserts. Even very much open to give their opinions. Dyuti gives me helping hand in kitchen chores. Any ways Sathya is just the opposite; he neither enters nor helps me in the kitchen but loves to be a tester :) My lil one rates the recipe by saying "Nummm" instead of Yumm. That's her way and I love to hear that. It suddenly occurred to me that I would keep the blog's name as such. This is the dialogue Dyuti asks me almost everyday whether I would be making any special for her. She wants to see something new & eye-catching every time.

Coming to the recipe, Baklava has it's Turkish origin. It's a rich pastry made of layers of Phyllo pastry sheets filled with chopped nuts and sweetened with sugar syrup.


More details on this dish can be found here

Well, I've made Baklava from scratch :) I wasn't keen on using the ready-made Phyllo sheets. After making the dough and keeping it to rest, I was not sure whether I'll end up in thin sheets.Literally was praying and
thinking if this doesn't turn out good, I may have to redo the dough. Alas I got the sheets very thin and it worked. I was really happy the way the sheets turned out.

You can get ready-made Phyllo sheets from supermarkets which ease your work a lot.The ready-made one's would be very thin as they are done using machine. Make sure once you open them up, cover the sheets with a damp cloth as it would dry out quickly.

We all loved the Home-made Baklava. Believe me, it is truly divine and so tasty in every bite. Sathya had taken to office and I was told his colleagues all liked it a lot :). Lucky for them; they always get a share of my desserts :P

Ingredients:

Phyllo Dough:

All Purpose flour - 1 and 3/4 cup
Salt - a pinch
Vegetable Oil - 2 tbsp
Water - 3/4 cup

Sugar Syrup:

Sugar - 2 cups
Water - 1 cup
Lemon juice - Half of a lime/lemon
Rosewater - 1 tbsp

Filling:

Pistachios - 1/2 cup
Almonds    - 1/2 cup
Any nuts of your choice
Butter - 1/2 cup

Preparing Phyllo dough:

1) Sieve All Purpose flour and salt in a bowl.
2) Make a well in the centre and pour the vegetable oil & water.
3) Mix with a spoon until well combined.
4) Knead the dough for around 20 minutes. Use flour to dust the kitchen counter so that it doesn't stick.
5) Place the dough in a bowl after kneading and cover it with a damp cloth. Keep it to rest for 1 hour.While the dough is resting, you may prepare the sugar syrup & the filling.


Preparing Sugar syrup:

1) Mix sugar, water and lemon juice in a small saucepan and heat the syrup in medium heat.
2) Allow it to boil.
3) Let it boil for another 10 minutes. The mixture would now thicken up a bit.
4) Add rose water and let it simmer for another 2-3 minutes.
5) Switch off the stove and let it cool.
6) Once cooled, the thick syrup can be stored in an air-tight container and refrigerate for a month.

Preparing filling:

1) Coarsely chop any nuts of your choice.
2) Add 2 tbsp butter & 1/4 cup of sugar syrup to the chopped nuts.
3) Mix the filling.

Rolling the Phyllo dough:

1) Take a small size of dough and roll it to a very thin sheet just like rolling chappathi. Use flour to dust the work surface.
2) Stretch all sides of the sheet.
3) Lay the sheet on the back of your hands and stretch using your knuckles.
4) Make sure you cover the rest of the dough with the damp cloth when you are rolling up the sheet.
5) Refer link on how to roll the sheets.

Assembling Baklava :

1) Grease baking tray with butter.
2) Place the first phyllo sheet on the baking tray and grease the sheet with butter.
3) Roll the second phyllo sheet in a similar manner mentioned above and place it on top of the first phyllo sheet, then grease with butter.
4) Continue another 3 similar phyllo sheets greasing with butter; make sure you grease each phyllo sheets with butter.
5) Place the filling and spread evenly.
6) Cover the filling with phyllo sheet, greasing with buter and continue with another 4 phyllo sheets; each one to grease with butter.
7) You would have a 5 phyllo sheets below, then the filling and topped with another 5 phyllo sheets.
8) Please make sure you grease each phyllo sheets with butter as that results in super flakiness.
9) You may now cut the Baklava into any shapes you desire before it goes to the oven.


Baking:

1) Pre-heat oven to 350°F/180°C/gas mark 4 for 10 minutes.
2) Bake the tray for 30 minutes.
3) Top of the Baklava should be golden brown in colour which is an indication that it's done.

Sweetening the Baklava:

1) Pour the Sugar syrup all over the Baklava once it's out from the oven. You could hear sizzling noise when the syrup is poured over the hot Baklava.
2) Let the Baklava sit for few hours so as to absorb the syrup.
3) You may refrigerate and can indulge in this Turkish sweet delight.